I made this recipe for Chicken Marsala the other night for dinner when my cousin came over. I was trying to think of something I could make with chicken since it she was coming over for dinner the night before my weigh-in. I sent her a text asking her if she liked mushrooms, because well, if you don't like mushrooms then a dish like Chicken Marsala might not be for you! Obviously she said yes!
What You Need:
1/4 cup all-purpose flour for coating
1/2 teaspoon salt
1/4 teaspoon ground black pepper
1/2 teaspoon dried oregano
4 skinless, boneless chicken breast halves - pounded 1/4 inch thick
4 tablespoons butter
4 tablespoons olive oil
1 cup sliced mushrooms
1/2 cup Marsala wine
1/4 cup cooking sherry
The Steps:
1.In a shallow dish or bowl, mix together the flour, salt, pepper and oregano. Coat chicken pieces in flour mixture.
2.In a large skillet, melt butter in oil over medium heat. Place chicken in the pan, and lightly brown. Turn over chicken pieces, and add mushrooms. Pour in wine and sherry. Cover skillet; simmer chicken 10 minutes, turning once, until no longer pink and juices run clear.
The Verdict:
YUM! A huge hit all around! This was delicious and so incredibly fast and easy to make. I served it with linguine, cooked just under al dente and then I transferred the linguine into the skillet that the chicken and mushrooms were in so the pasta could soak up the sauce. I actually regretted making this on the night before a weigh-in because it was so hard not to grab seconds! I am one of those "don't like mushroom" people and I still LOVED it, for me my dislike of mushrooms is a texture thing so it's no big deal for me to pick them out, which is EXACTLY what I did. Now if you're like my friend Ben you won't go near this dish with a 10 foot pole!
I cannot wait to make this one again. Especially since it was pretty much one of the easiest dishes that tasted gourmet I have made in a long time! Oh and to add the veggie factor, I roasted some fresh green beans in the oven, sprinkled with a little kosher salt and drizzled in olive oil (bake at 400 for about 10 minutes!).

Saturday, September 4, 2010

Friday, August 27, 2010
Pioneer Woman's Pasta Primavera
I have never been big on veggie dishes. What can I say, I like meat! But since starting Biggest Loser I have had to incorporate more veggies into my diet. It isn't easy trying to find recipes that are both healthy AND tasty! So I was happy to find this Pasta Primavera recipe on one of my favorite recipe sites! Click on the link to see step by step pictures...I didn't take any of my own this time.
What You Need:
1 cup Bite-sized Broccoli Pieces (up to 1 1/2 Cups)
½ whole Onion Diced Finely
3 cloves To 4 Cloves Garlic, Chopped Finely
2 whole Medium To Large Carrots, Sliced On The Bias (diagonally)
2 whole Medium Zucchini, Sliced On The Bias (diagonally)
1 whole Medium Yellow Squash (optional)
1 container (about 5 Oz.) White Button Or Baby Porcini Mushrooms, Roughly Sliced
1 whole Red Bell Pepper, Sliced Into Strips
4 Tablespoons Butter
2 Tablespoons Olive Oil
1 pound Pasta (She used Penne, I used Faralle)
FOR THE SAUCE:
¼ cups Dry White Wine (up To 1/2 Cup), Optional (replace with additional broth if not using)
½ cups Low Sodium Chicken Broth
1 cup Whipping (heavy) Cream
1 cup Half-and-half
½ cups Grated Parmesan Cheese
5 leaves Basil (or More To Taste), Plus Extra For Garnish
½ cups Frozen Peas
The Steps:
First, prep the vegetables. Chop the broccoli into bite-sized pieces, about 1 to 1 ½ cups worth. Dice half a yellow onion. Chop 3 to 4 cloves of garlic. Slice carrots on the bias (diagonally), and do the same for the zucchini and yellow squash. Roughly slice the mushrooms and slice the red pepper (seeded) into strips.
Heat 2 tablespoons butter with 2 tablespoons olive oil in a skillet over medium-high heat. Add the chopped onion and garlic together and cook for a minute or two, until they start to turn translucent. Then throw in the broccoli. Stir, and add in the carrots.
Stir it around, cooking it for only a minute, tops. Transfer the mixture to a plate. Add in the red pepper strips to the skillet. Stir them around for a minute or so, then transfer them to the plate.
Add pasta to slightly salted boiling water and cook to al dente.
Add a tablespoon of butter to the skillet. Add squash and zucchini, cook for less than a minute, then transfer to plate. Cook mushrooms for a minute or two (add salt to taste), and again transfer to the plate.
FOR THE SAUCE
To make the sauce, pour ¼ to ½ cup dry white wine into the skillet (see note below). Add ½ cup low-sodium chicken broth, a tablespoon of butter and scrape the bottom of the skillet to pull up the flavor left behind by the veggie cooking. Cook for 1 to 2 minutes until the liquid starts to thicken.
Add 1 cup whipping cream and 1 cup half-and-half. Measure out ½ cup grated Parmesan; add to the skillet. Add salt and pepper to taste. Chiffonade 5 to 6 fresh basil leaves and add that to the sauce; stir.
Dump veggies and mushrooms into the sauce along with ½ cup frozen peas right out of the freezer. Add pasta al dente and stir. If the sauce seems a little thick, or if there doesn’t seem to be enough sauce, add a good splash of chicken broth and a little more half-and-half. Top with more Parmesan, salt, pepper, and basil to taste.
Note: if you’re averse to wine, add chicken broth instead. But watch the salt later.
The Verdict:
For a dish with no meat, this was surprisingly very filling, but more importantly very tasty! I made some healthier substitutions to the sauce by skipping the whipping cream and using whole milk instead, along with the half and half. The Doc was a BIG fan and even the boys enjoyed it. This is going to have to be a regular dish in our rotation!
Monday, August 16, 2010
P.F. Chang's Mongolian Beef & Garlic Noodles
As a gift, from my friend Susan, I received a cookbook called America's Most Wanted Recipes: Delicious Recipes from Your Family's Favorite Restaurants. There were some really cook dishes in the book and I tried the Applebee's Crispy Orange Chicken Skillet. It was a huge hit, though not exactly figure friendly. I was out shopping last week and saw a copy of the second edition, More of America's Most Wanted Recipes: More Than 200 Simple and Delicious Secret Restaurant Recipes--All for $10 or Less! and bought it because it had a copycat recipe for one of our favorite dishes at the Cheesecake Factory, which was delicious, by the way! Tonight I decided to try the P.F. Chang's Mongolian Beef and serve it with the recipe for Garlic Noodles. While I have eaten at P.F. Chang's before, I have never had either dish so I wasn't sure what to expect, but everything turned out delicious.
Mongolian Beef
What You Need:
For the Sauce:
2 tsp vegetable oil
1/2 tsp minced peeled fresh ginger
1 Tb chopped garlic
3/4 cup packed dark brown sugar
1/2 cup soy sauce
1 pound flank steak
1/4 cup cornstarch
1 cup vegetable oil
2 green onions sliced
The Steps:
1. To make the sauce, heat the 2 teaspoons vegetable oil in a medium saucepan and saute the ginger and garlic, stirring continuously. Do not let the garlic burn. Add the brown sugar, soy sauce, and 1/2 cup of water. Dissolve the brown sugar by whisking vigorously. Bring the mixture to a boil and let the sauce thicken, then set it aside until read to use.
2. Slice the flank steak into 1/4-inch-thick pieces. Be sure to cut against the grain of the meat so that it remains tender. Coat each piece lightly in the cornstarch and refrigerate for 10 minutes.
3. Heat the oil in a wok or large skillet. Add the beef, working in batches, and fry until each piece is slightly golden brown. Remove to a paper towel and drain. Discard the oil.

4. Heat the wok over medium heat and return the meat to stir-fry for 1 minute. Add the sauce and simmer for 1 minute, then add the green onions. Stir fry for another minute, then transfer to a serving platter.

Garlic Noodles
What you Need:
Cantonese Stir-Fry Sauce
1/4 cup water
1 Tb chicken bouillon powder
1 Tb sugar
1 Tb Shao Hsing (or dry vermouth or the book recommends a medium dry Sherry)
1 Tb oyster sauce
1/2 tsp salt
1 tsp cornstarch
Noodles
1 Tb minced garlic
2 Tb chopped chile pepper
2 Tb canola oil
1 Tb sugar
2 Tb white vinegar
1 lb fresh Chinese noodles or vermicelli (cooked according to package directions)
1/2 tsp red pepper flakes
2 Tb chopped fresh cilantro
1/2 tsp Asian sesame oil
The Steps:
1. Make the Cantonese sauce by combining all the sauce ingredients in a small bowl and whisking to blend well. Set aside.
2. Heat a wok or skillet and stir-fry the garlic and chile pepper in the canola oil, about 1 minute. do not let the garlic burn.

Add the sugar and vinegar and stir to blend. Add the cooked noodles with the red pepper flakes and cilantro, then add 1/2 cup of the Cantonese sauce.
Drizzle the sesame oil over everything in the wok and stir to mix, allowing the sauce to thicken.
The Verdict:
Not exactly the healthy dinner I should have made, but it was so very yummy! I was bad and even got seconds it was so good.

Next time I make this, I will use vermicelli or a thinner Chinese noodle. The noodles above are wide Chinese Lo Mien noodles and they worked but I prefer a thinner noodle. I also missed the part about adding a 1/2 cup of water to the Mongolian stir-fry sauce. So perhaps our sauce was more concentrated? I don't know or care for that matter because it didn't affect the taste, and that is really all that matters!
If you wanted to make this dish healthier, you could always grill the flank steak first, then slice it and stir-fry it. It wouldn't be as bad as frying the stead with the cornstarch. The downside is that you wouldn't get the same texture on the meat. Another way to save calories would be to serve it with brown rice, which was my intention, until I saw the recipe for the garlic noodles.
The best part is that this is super easy and fast to make. The sauces can be made ahead of time and refrigerated too. I really don't think this one will disappoint!
Mongolian Beef

What You Need:
For the Sauce:
2 tsp vegetable oil
1/2 tsp minced peeled fresh ginger
1 Tb chopped garlic
3/4 cup packed dark brown sugar
1/2 cup soy sauce
1 pound flank steak
1/4 cup cornstarch
1 cup vegetable oil
2 green onions sliced
The Steps:
1. To make the sauce, heat the 2 teaspoons vegetable oil in a medium saucepan and saute the ginger and garlic, stirring continuously. Do not let the garlic burn. Add the brown sugar, soy sauce, and 1/2 cup of water. Dissolve the brown sugar by whisking vigorously. Bring the mixture to a boil and let the sauce thicken, then set it aside until read to use.
2. Slice the flank steak into 1/4-inch-thick pieces. Be sure to cut against the grain of the meat so that it remains tender. Coat each piece lightly in the cornstarch and refrigerate for 10 minutes.
3. Heat the oil in a wok or large skillet. Add the beef, working in batches, and fry until each piece is slightly golden brown. Remove to a paper towel and drain. Discard the oil.

4. Heat the wok over medium heat and return the meat to stir-fry for 1 minute. Add the sauce and simmer for 1 minute, then add the green onions. Stir fry for another minute, then transfer to a serving platter.

Garlic Noodles
What you Need:
Cantonese Stir-Fry Sauce
1/4 cup water
1 Tb chicken bouillon powder
1 Tb sugar
1 Tb Shao Hsing (or dry vermouth or the book recommends a medium dry Sherry)
1 Tb oyster sauce
1/2 tsp salt
1 tsp cornstarch
Noodles
1 Tb minced garlic
2 Tb chopped chile pepper
2 Tb canola oil
1 Tb sugar
2 Tb white vinegar
1 lb fresh Chinese noodles or vermicelli (cooked according to package directions)
1/2 tsp red pepper flakes
2 Tb chopped fresh cilantro
1/2 tsp Asian sesame oil
The Steps:
1. Make the Cantonese sauce by combining all the sauce ingredients in a small bowl and whisking to blend well. Set aside.
2. Heat a wok or skillet and stir-fry the garlic and chile pepper in the canola oil, about 1 minute. do not let the garlic burn.

Add the sugar and vinegar and stir to blend. Add the cooked noodles with the red pepper flakes and cilantro, then add 1/2 cup of the Cantonese sauce.

Drizzle the sesame oil over everything in the wok and stir to mix, allowing the sauce to thicken.
The Verdict:
Not exactly the healthy dinner I should have made, but it was so very yummy! I was bad and even got seconds it was so good.

Next time I make this, I will use vermicelli or a thinner Chinese noodle. The noodles above are wide Chinese Lo Mien noodles and they worked but I prefer a thinner noodle. I also missed the part about adding a 1/2 cup of water to the Mongolian stir-fry sauce. So perhaps our sauce was more concentrated? I don't know or care for that matter because it didn't affect the taste, and that is really all that matters!
If you wanted to make this dish healthier, you could always grill the flank steak first, then slice it and stir-fry it. It wouldn't be as bad as frying the stead with the cornstarch. The downside is that you wouldn't get the same texture on the meat. Another way to save calories would be to serve it with brown rice, which was my intention, until I saw the recipe for the garlic noodles.
The best part is that this is super easy and fast to make. The sauces can be made ahead of time and refrigerated too. I really don't think this one will disappoint!
Thursday, August 12, 2010
Homemade Granola Bars
A while back my friend Susan had mentioned that she had a recipe for homemade granola bars. Since I am not much of a baker, I never thought it would be something I would ever want to make, and so I never bothered to get the recipe. I had forgotten all about it until recently, when I was talking to her about the changes I wanted to make in our diets, and how I was looking at more ways to cut out processed foods. She mentioned the recipe again and the next time I brought the boys over to play she had made a batch! They were delicious. I told her that she needed to send me the recipe so that I could try them out myself.
What You Need:

2 cups rolled oats
3/4 cup packed brown sugar
1/2 cup wheat germ
3/4 teaspoon ground cinnamon
1 cup all-purpose flour
3/4 cup raisins (optional)
3/4 teaspoon salt
1/2 cup honey
1 egg, beaten
1/2 cup vegetable oil
2 teaspoons vanilla extract
The Steps:
1. Preheat the oven to 350 degrees F (175 degrees C). Generously grease a 9x13 inch baking pan.
2. In a large bowl, mix together the oats, brown sugar, wheat germ, cinnamon, flour, raisins and salt.


Make a well in the center, and pour in the honey, egg, oil and vanilla.

Mix well using your hands. Pat the mixture evenly into the prepared pan.

3. Bake for 30 to 35 minutes in the preheated oven, until the bars begin to turn golden at the edges. Cool for 5 minutes, then cut into bars while still warm. Do not allow the bars to cool completely before cutting, or they will be too hard to cut.
The Verdict:
AMAZING! Really, they are so good. Per Susan's recommendations, I followed the tips in the first set of comments:
This recipe is really great, but I have some changes that can make it near perfect. I used whole wheat flour instead of all-purpose flour, canola oil in place of vegetable oil, and I reduce the brown sugar to 1/2 cup and they are still super sweet, and even down to 1/3 cup and they're still yummy. For flavor I always use 1 tsp. of cinnamon and a whole cup of raisins. To make them chewy still use a 9x13 pan but don't spread the mixture into the entire pan- leave about an inch and a half empty space on one end. (The batter will cook exactly as it sits so you don't have to worry about it spreading. Also, you must be careful not to overcook these. Thirty minutes is way too long, but since every oven is different I can only really tell you that you need to take them out right when you see the edges becoming brown (the middle may still appear undone.) For me that is 18 minutes. If you do that they will stay chewy forever--just store them in a ziploc bag. And my last bit of advice is that you can get really creative with this recipe. For example, instead of raisins add dried cranberries and slivered almonds. Or up the cinnamon and add chopped dried apples. Or you could add peanut butter and freeze dried banana bits (like you find in the toddler section). Or you could play around with some canned pumpkin and pumpkin pie spice. Just have fun!
I used the 1/3 cup of sugar, whole wheat flour, canola oil (with 1 tablespoon of Flax Oil added in), and the full tsp of cinnamon. I also substituted the raisins for chocolate chips. The first time I made them I also added some dried cranberries. Next time I am thinking about trying the peanut butter. They really are versatile and the best part is that since they are homemade, you control the ingredients.

As you can see from the picture above, I overcooked them the first time. The second time I took them out of my oven after 20 minutes and they were PERFECT! The boys can't get enough of them! Even the Doc is a fan!
Ready for the taste test!

All gone!

Saturday, July 31, 2010
Eggplant Parmesean
As you saw in the previous post, I started growing my own basil (OK, I meant the boys). I had so much I thought I would try making my own pesto. I googled it and found this recipe from Tyler Florence. It was from his show How to Boil Water and the episode was called Veggie Delight. Often times I will click on the link to see what else was made during that shows episode. That is when I saw his recipe for Eggplant Parmesan. Eggplant has always been one of the veggies that scared me. I was never a fan of the texture or taste but, I never ate peppers or onions before and now I don't mind them in my food, so I decided to give Eggplant a second chance.
Eggplant Parmesan
What You Need:
1/3 cup extra-virgin olive oil
3 garlic cloves, minced
1 cup black olives, pitted and roughly chopped
1 teaspoon hot red pepper flakes
3 tablespoons capers, drained
2 (28-ounce) cans tomatoes (recommended: San Marzano), crushed by hand
1/4 cup fresh basil leaves, hand torn
Kosher salt and freshly ground black pepper
4 cups dried bread crumbs
1 tablespoon garlic powder 1 tablespoon dried oregano
Salt and freshly ground black pepper
5 eggs
1 cup all-purpose flour
Extra-virgin olive oil
4 pounds medium eggplants, trimmed and cut lengthwise into 1/2-inch-thick slices
2 pounds whole milk ricotta cheese
1/2 cup chopped fresh basil leaves
1 1/4 cups freshly grated Parmigiano-Romano
2 pounds shredded mozzarella cheese
The Steps:
First make the sauce: Put a large saucepan over medium heat and add the olive oil. Add the garlic and cook 1 minute. Add the olives, red pepper flakes, and capers, and let that cook for 2 minutes, stirring often. Toss in the tomatoes with their juices and bring to a low simmer. Stir in the basil and season with salt and pepper. Simmer for 10 minutes. Remove from the heat and set aside.

Combine the bread crumbs, garlic powder, and oregano in a shallow bowl; season generously with salt and pepper and mix well. Crack 3 of the eggs into another shallow bowl; season with salt and pepper and beat with a fork to mix. Put the flour in another shallow bowl and season with salt and pepper. Arrange the eggplant, flour, beaten eggs, and bread crumbs on a work surface near the stove.

Heat about 1/4-inch olive oil in a large skillet over medium heat. When the oil is hot, dredge several eggplant slices first in the flour, then dip them in the egg, and finally coat them in the bread crumbs. Put as many eggplant in the skillet as will fit comfortably in a single layer and cook until tender and well browned on both sides. Drain on paper towels. Cook all of the eggplant slices this way, adding more olive oil to the pan as needed.

Stir together the ricotta and 1/2 cup of the Parmigiano cheese. Stir in the basil and remaining 2 eggs, and season with salt and pepper.
Preheat the oven to 350 degrees F.
To assemble the dish, first get yourself set up with a large, buttered baking dish. Have ready the eggplant, the ricotta mixture, the tomato sauce, the shredded mozzarella cheese and the remaining 3/4 cup grated Parmigiano. To start, spoon some of the tomato sauce over the bottom of the baking dish. Now add a layer of eggplant. Spread with half of the ricotta mixture.
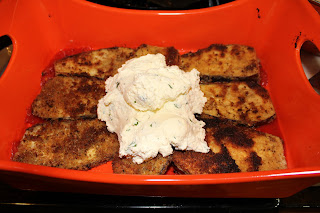
Spoon another layer of tomato sauce over and sprinkle with about one-third of the mozzarella. Repeat with a layer of eggplant, the rest of the ricotta, tomato sauce, and another third of the mozzarella. Finish with the rest of the eggplant, the rest of the tomato sauce, and the rest of the mozzarella. Sprinkle with the 3/4 cup Parmigiano.
Put the dish in the oven and bake for about 1 hour, until golden and bubbling. Let stand for about 20 minutes before cutting.
The Verdict:
I actually thought it was pretty good, the Doc, not so much. He wasn't a fan of eggplant before either, but this didn't change his mind. David tried it, but I am not sure he loved it, however, Shaun couldn't get enough. I am wondering if he just liked the cheesey goodness surrounding the fried eggplant.
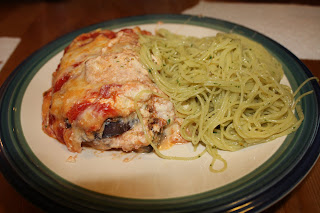
For this dish, I made my own bread crumbs by throwing some slices of stale whole wheat bread into my food processor (OMG, I love that thing!). In my mind, using whole wheat bread to make the crumbs made "healthier". Ha! I also did use lower fat mozzarella cheese, however I did use full fat ricotta. I don't see why you would need to use the full fat, though I definitely would NOT use fat free because I do notice a difference.

I got some feedback from some friends, who are experts on the dish, and I was advised for next time to cut it in circles and skin it. I also didn't cut it as thin as I would have liked. I think this is definitely worth trying out again, because the boys seemed to like it enough and I would like to see how different it turns out making those adjustments. I'll just have to make some chicken for the Doc! I would also need to make sure I gave myself more time to prepare so we're not eating dinner at 7:30 again. This dish is more of a weekend dinner, as opposed to a weeknight dinner.
Eggplant Parmesan
What You Need:
1/3 cup extra-virgin olive oil
3 garlic cloves, minced
1 cup black olives, pitted and roughly chopped
1 teaspoon hot red pepper flakes
3 tablespoons capers, drained
2 (28-ounce) cans tomatoes (recommended: San Marzano), crushed by hand
1/4 cup fresh basil leaves, hand torn
Kosher salt and freshly ground black pepper
4 cups dried bread crumbs
1 tablespoon garlic powder 1 tablespoon dried oregano
Salt and freshly ground black pepper
5 eggs
1 cup all-purpose flour
Extra-virgin olive oil
4 pounds medium eggplants, trimmed and cut lengthwise into 1/2-inch-thick slices
2 pounds whole milk ricotta cheese
1/2 cup chopped fresh basil leaves
1 1/4 cups freshly grated Parmigiano-Romano
2 pounds shredded mozzarella cheese
The Steps:
First make the sauce: Put a large saucepan over medium heat and add the olive oil. Add the garlic and cook 1 minute. Add the olives, red pepper flakes, and capers, and let that cook for 2 minutes, stirring often. Toss in the tomatoes with their juices and bring to a low simmer. Stir in the basil and season with salt and pepper. Simmer for 10 minutes. Remove from the heat and set aside.

Combine the bread crumbs, garlic powder, and oregano in a shallow bowl; season generously with salt and pepper and mix well. Crack 3 of the eggs into another shallow bowl; season with salt and pepper and beat with a fork to mix. Put the flour in another shallow bowl and season with salt and pepper. Arrange the eggplant, flour, beaten eggs, and bread crumbs on a work surface near the stove.

Heat about 1/4-inch olive oil in a large skillet over medium heat. When the oil is hot, dredge several eggplant slices first in the flour, then dip them in the egg, and finally coat them in the bread crumbs. Put as many eggplant in the skillet as will fit comfortably in a single layer and cook until tender and well browned on both sides. Drain on paper towels. Cook all of the eggplant slices this way, adding more olive oil to the pan as needed.

Stir together the ricotta and 1/2 cup of the Parmigiano cheese. Stir in the basil and remaining 2 eggs, and season with salt and pepper.
Preheat the oven to 350 degrees F.
To assemble the dish, first get yourself set up with a large, buttered baking dish. Have ready the eggplant, the ricotta mixture, the tomato sauce, the shredded mozzarella cheese and the remaining 3/4 cup grated Parmigiano. To start, spoon some of the tomato sauce over the bottom of the baking dish. Now add a layer of eggplant. Spread with half of the ricotta mixture.

Spoon another layer of tomato sauce over and sprinkle with about one-third of the mozzarella. Repeat with a layer of eggplant, the rest of the ricotta, tomato sauce, and another third of the mozzarella. Finish with the rest of the eggplant, the rest of the tomato sauce, and the rest of the mozzarella. Sprinkle with the 3/4 cup Parmigiano.
Put the dish in the oven and bake for about 1 hour, until golden and bubbling. Let stand for about 20 minutes before cutting.
The Verdict:
I actually thought it was pretty good, the Doc, not so much. He wasn't a fan of eggplant before either, but this didn't change his mind. David tried it, but I am not sure he loved it, however, Shaun couldn't get enough. I am wondering if he just liked the cheesey goodness surrounding the fried eggplant.

For this dish, I made my own bread crumbs by throwing some slices of stale whole wheat bread into my food processor (OMG, I love that thing!). In my mind, using whole wheat bread to make the crumbs made "healthier". Ha! I also did use lower fat mozzarella cheese, however I did use full fat ricotta. I don't see why you would need to use the full fat, though I definitely would NOT use fat free because I do notice a difference.

I got some feedback from some friends, who are experts on the dish, and I was advised for next time to cut it in circles and skin it. I also didn't cut it as thin as I would have liked. I think this is definitely worth trying out again, because the boys seemed to like it enough and I would like to see how different it turns out making those adjustments. I'll just have to make some chicken for the Doc! I would also need to make sure I gave myself more time to prepare so we're not eating dinner at 7:30 again. This dish is more of a weekend dinner, as opposed to a weeknight dinner.
Tuesday, July 27, 2010
Fresh Basil
I have started an herb garden! Well OK, I didn't start an herb garden, the boys started an herb garden with Daddy's help! The last two times I tried turned into a big FAIL! I bought one of those potted basil plants from the supermarket and the boys re-potted it in the window box I picked up at target. It is my opinion, that basil MUST be fresh, ALWAYS! The problem is that it's expensive to buy at the supermarket and you never use all of it before it goes bad. So the best way to prevent that is to grow your own. Along with the basil, they also planted some oregano and cilantro seeds. At first I didn't think it was going to make it, but it persevered through the nasty triple H weather and within a week my basil had doubled in size and the oregano and cilantro budded.
Our City Back Yard Herb Garden

Since I had so much basil, I decided to make some pesto for dinner! While browsing pasta dishes I also came across a recipe for Eggplant Parmesan. I have never made it before, but decided to give it a shot, since it fits into my goal of adding more veggies into our diets! I will post the recipe I used, along with pictures tomorrow! For now, it's late and time for this tired Momma to hit the sack!
Thursday, July 22, 2010
My New Food Journey!
Five weeks ago I made a decision to get back on track. I had plateaued with my post-pregnancy weight loss and I was feeling really down about it. It was time to stop making excuses and just start cooking again. I have been in a big time rut, but I am excited to start cooking again and making healthy meals for me and the boys! I am looking at food in a whole new way now and my goal is to cut out as much processed food as possible, and start making better choices about the food we eat. By doing this, I feel like I don't have to be on a "diet". Everything in moderation!
For tonights dinner, I made Flank Steak Salad with Plums and Blue Cheese that I saw in the August 2010 edition of Cooking Light Magazine that I picked up at the supermarket the other night. Salads are becoming a go to dinner when I don't feel like cooking. This one is very simple but very flavorful!
What You Need:
1/2 teaspoon freshly ground black pepper
1/4 teaspoon salt
1 1/2 tablespoons olive oil, divided
4 teaspoons fresh lemon juice, divided
1lb flank steak, trimmed
Cooking spray
1 teaspoon honey
1/8 teaspoon salt
8 cups loosely packed baby arugula
3 plums, thinly sliced
1/4 cup crumbled blue cheese
The Steps:
1. Combine pepper, 1/4 teaspoon salt, 1 1/2 teaspoons olive oil, and 1 teaspoon lemon juice in a small bowl; rub over both sides of steak.
2. Heat a large skillet over medium-high heat. Coat pan with cooking spray. Add steak to pan; cook 5 minutes on each side or until desired degree of doneness. Remove steak from pan; let rest 5 minutes. Cut steak diagonally across grain into thin slices.
3. Combine remaining 1 tablespoon olive oil, 1 tablespoon lemon juice, honey, and 1/8 teaspoon salt in a large bowl; stir well with a whisk. Add arugula; toss gently to coat. Arrange about 1 1/2 cups arugula mixture onto each of 4 plates; top each serving with 3 ounces steak, about 1/2 cup plums, and 1 tablespoon cheese.

The Verdict:
This was really, really good! I have never been a fan of arugula before, heck I have never really been into "Rabbit Food" (as my brother Dave calls it) before. To be perfectly honest, I turned my nose up at it before really giving it a fair chance. It wasn't half bad though! It definitely has more bite to it than a spinach salad would but I'll use it again.
The dressing was excellent! Very light and had a hint of sweetness form the honey. I loved that it had a "from scratch" dressing because it fits into my goal of cutting out processed foods. By making the dressing myself, as opposed to buying it from the store, I know what is in the dressing there are no fillers or preservatives!
I ended up using thinly sliced sirloin steak because the supermarket was out of flank steak. We also grilled it because, it's summer and that is what you do with meat in the summer! The Doc is the GrillMaster of the house and the steaks were perfectly grilled!
All around a fabulous dinner and when you eat a dinner like that you have saved yourself some room for some ICE CREAM!
Subscribe to:
Posts (Atom)